
A Natural Facelift
Sep 22nd 2021
Jade rollers are all of the rage right now (and rightfully so, but that’s for another blog post), however, there is another skincare tool that deserves the hype as well. Guasha is another tool made of jade or other crystals similar to the facial rollers. The difference is that a GuaSha is a flat piece of crystal rather than a rounded piece that rolls. This allows us to apply slight pressure which aids in good skin health when done correctly. This tool has been used for thousands of years in Ancient Chinese Medicine. Here’s how this facial massage is beneficial:
- Relieves stress
- Relaxes facial muscles and breaks up fascia (fibrous muscle tissue) to help relieve tension
- Improves circulation (this can help give a natural glow, combat acne, dark circles, and wrinkles)
- Brings fresh blood to the surface which helps plump the skin, fight aging, and can even heal acne scars more quickly
- Assists in lymphatic drainage which helps remove toxins from the body
- Firming
- Depuffs the skin
- Works products deeper into to skin allowing for maximum benefits
- Temporarily sculpts and contours the face (that natural face lift we all want!)
Now that you know why this tool is a great addition to your skincare routine, how do you use it? Will it make you late for work or keep you from getting to bed at a reasonable hour? Does it hurt?
A full facial massage with your GuaSha can be done in as little as five minutes! Of course, you can make it longer if you have the time or would like to give yourself a longer massage. Guasha is not painful and as you can see from the list of benefits, it is actually very relaxing.
How to give yourself a GuaSha facial massage:
- On freshly cleansed skin, following a hydrating beauty water or mist if you’d like, warm your moisturizer, oil, or serum in your hands and gently press into the skin and neck. You may choose to use slightly more product than usual (not much) to help the tool glide on the skin more easily.
- The most important thing to keep in mind is to always hold your tool flat against the skin. This means you should not be using the edge of your tool when doing this. Using the edge will cause you to use much more pressure than needed and will tug on the skin which is not what we are trying to do! (See image below)
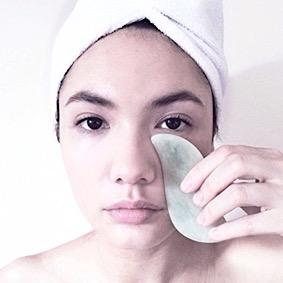
Image belongs to: www.gingerchi.com
- Begin at the center of the forehead, pull your tool outward towards the hairline using light pressure. Move slightly lower, just above the eyebrow and repeat. Finish this part of the face by stroking from between the brows up to the hairline.
- Very gently, using no applied pressure, glide the tool under the eye. Move upwards towards the temple.
- Move down to the upper cheek and begin at the side of the nose. With light pressure, move the tool upwards towards the temple.
- Repeat this same motion below the cheekbone. Start at the edge of your lips, moving towards the hairline. Do this same motion starting at the middle of the chin, just above the jawline.
- Repeat this motion beginning at the center of the chin, gliding along the jaw and towards the ear.
- Just above your chest, pull the tool upwards, stopping at the jaw. Repeat alongside that center line on both the right and left side.
- On the outer sides of the neck, begin behind the ear and pull downwards towards the chest. This is the only area where you will motion downwards. This is where the lymph nodes are located. This opens that area up and allows all of the lymphatic fluid released during the massage to flow and drain properly.
- Enjoy your glowy, sculpted, and firm skin and thank yourself for this act of self-care!
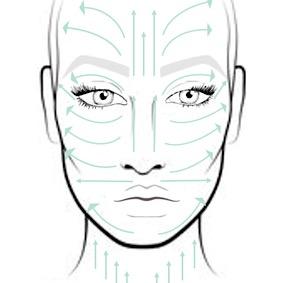
Image belongs to: fromrootssheblooms.com